AI Agent集成MCP实用教程
将AI集成到系统和开发工具中变得越来越普遍,其中AI Agent为用户交互带来了一个全新模式。例如在Amazon Q Developer等代码辅助工具中,用户只需给AI分配任务,它就能自主规划并完成操作。接下来将由站长百科详细为大家介绍在亚马逊云科技上集成MCP Server与Agent的全流程。
一、MCP与Agent集成原理
MCP(Model Context Protocol)提供了Agent连接外部服务的标准方法,例如产品数据库、CRM系统等。要实现连接,Agent需作为MCP Client,通过配置或代码获取与之交互的MCP Server列表。
MCP规范定义了两种基础传输方式:
1、STDIO传输:适用于本地进程分叉场景,目前多数AI代码辅助工具中的MCP Server采用此方式,可直接访问开发者本地资源。
2、Server-Sent Events(SSE)传输:适用于网络服务器场景,支持客户端与服务器的状态更新(如工具列表变化时主动通知)。但由于有状态协议在Serverless架构中兼容性较差,2025年3月MCP规范更新为更简单的Streamable HTTP协议(当前官方SDK暂未支持,后续将跟进介绍)。
二、在亚马逊云科技上部署MCP Server
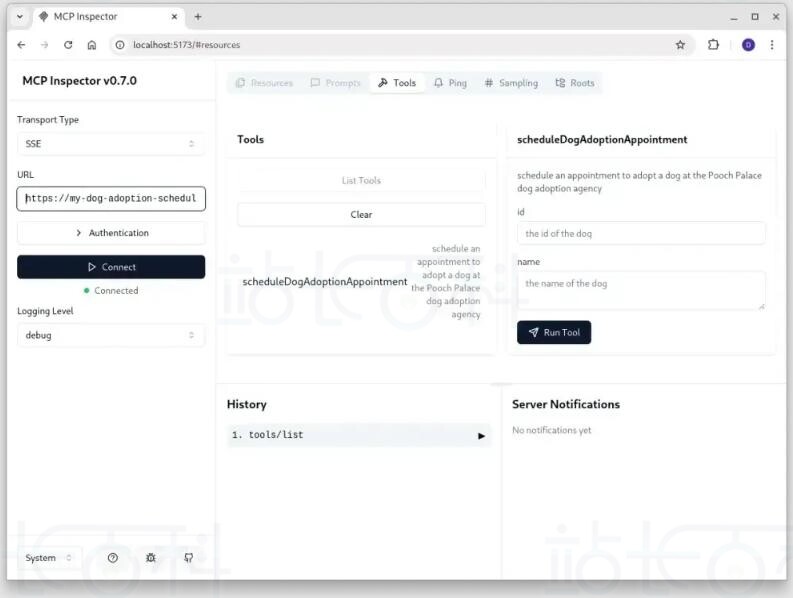
亚马逊云科技支持通过亚马逊云服务器、EKS、ECS等服务运行基于SSE的MCP Server。以下以Java + Spring AI为例,演示如何实现一个预约领养狗狗的MCP Server(代码来自AWS官方):
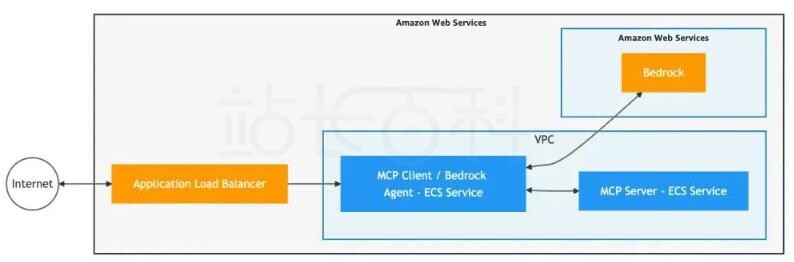
网络架构如下:
1、核心代码实现
@SpringBootApplication publicclassSchedulingApplication {publicstaticvoidmain(String[] args){
SpringApplication.run(SchedulingApplication.class, args);
}@Bean
ToolCallbackProvider serviceToolCallbackProvider(
DogAdoptionAppointmentScheduler scheduler) {
return MethodToolCallbackProvider.builder()
.toolObjects(scheduler)
.build();
}}
@Service
classDogAdoptionAppointmentScheduler {@Tool(description = "schedule an appointment to adopt a dog" +
" at the Pooch Palace dog adoption agency")
String scheduleDogAdoptionAppointment(
@ToolParam(description = "the id of the dog") int id,
@ToolParam(description = "the name of the dog") String name) {
// demo scheduling response (but could use backing data / services on AWS)
var instant = Instant.now().plus(3, ChronoUnit.DAYS);
System.out.println("confirming the appointment: " + instant + " for dog " + id + " named " + name);
return instant.toString();
}
}
2、Maven依赖配置
<!-- the BOM for Spring AI --> <dependencyManagement> <dependencies> <dependency> <groupId>org.springframework.ai</groupId> <artifactId>spring-ai-bom</artifactId> <version>1.0.0-M6</version> <type>pom</type> <scope>import</scope> </dependency> </dependencies> </dependencyManagement> <dependencies> <!-- The Spring Webflux MCP Server --> <dependency> <groupId>org.springframework.ai</groupId> <artifactId>spring-ai-mcp-server-webflux-spring-boot-starter</artifactId> </dependency> </dependencies>
3、部署与安全配置
MCP Server可通过安全组限制访问,仅允许VPC内的MCP Client通信。如需公开访问,可结合AWS API Gateway等服务配置身份验证。
三、集成Agent与MCP Client
完成MCP Server部署后,可通过以下两种方式在亚马逊云科技上运行Agent:
1、使用Amazon Bedrock内置Agent:直接对接MCP Server。
2、基于Spring AI构建自定义Agent:通过REST API暴露服务,以下为实现示例:
1、依赖配置(Maven)
<!-- the BOM for Spring AI --> <dependencyManagement> <dependencies> <dependency> <groupId>org.springframework.ai</groupId> <artifactId>spring-ai-bom</artifactId> <version>1.0.0-M6</version> <type>pom</type> <scope>import</scope> </dependency> </dependencies> </dependencyManagement> <dependencies> <!-- enable a REST server --> <dependency> <groupId>org.springframework.boot</groupId> <artifactId>spring-boot-starter-web</artifactId> </dependency> <!-- MCP Client --> <dependency> <groupId>org.springframework.ai</groupId> <artifactId>spring-ai-mcp-client-spring-boot-starter</artifactId> </dependency> <!-- Amazon Bedrock Converse support in Spring AI --> <dependency> <groupId>org.springframework.ai</groupId> <artifactId>spring-ai-bedrock-converse-spring-boot-starter</artifactId> </dependency> <!-- for an automatic health check URL --> <dependency> <groupId>org.springframework.boot</groupId> <artifactId>spring-boot-starter-actuator</artifactId> </dependency> </dependencies>
2、配置文件(application.properties)
spring.ai.bedrock.converse.chat.options.model=amazon.nova-pro-v1:0 spring.ai.bedrock.converse.chat.enabled=true
3、REST控制器实现
@RestController classConversationalController {privatefinal ChatClient chatClient;
ConversationalController(
@Value("${scheduling-service.url}") String schedulingUrl,
ChatClient.Builder builder) {var mcpClient = McpClient
.sync(new HttpClientSseClientTransport(url))
.build();mcpClient.initialize();
this.chatClient = builder
.defaultTools(new SyncMcpToolCallbackProvider(mcpClient))
.build();
}@PostMapping("/inquire")
String inquire(@RequestParam String question){
return chatClient
.prompt()
.user(question)
.call()
.content();
}
}
四、实战测试
将Agent服务部署到Amazon ECS后,可通过以下命令测试:
curl -X POST --location "http://myecsserver/inquire" \ -H "Content-Type: application/x-www-form-urlencoded" \ -d 'question=when can i schedule to adopt Prancer'
此时,Agent会通过MCP Client调用Server中的预约工具,返回如“3天后可预约领养Prancer”的结果。
相关阅读:
《如何使用MCP Typescript SDK构建MCP客户端》
《Amazon Bedrock+DeepSeek搭建企业知识库图文教程》

广告合作

QQ群号:4114653
温馨提示:
- 本网站发布的内容(图片、视频和文字)以原创、转载和分享网络内容为主,如果涉及侵权请尽快告知,我们将会在第一时间删除。邮箱:2942802716#qq.com(#改为@)。
- 本站原创内容未经允许不得转裁,转载请注明出处“站长百科”和原文地址。